Assignment 7
Type: Group Assignment
Due: by 10:00 PM on Tuesday, May 21, 2019
- Prologue
- Introduction
- Part 1: Creating a Turtle Class
- Part 2: Drawing Shapes
- Part 3: Creative Art
- How to Turn in Your Code
Prologue
This assignment can be completed either individually or in a group of your choosing. However, groups must not be larger than two unless explicitly approved by the instructor.
If you choose to work in a group, be sure to review our Code of Conduct and be careful to adhere to it when working on the assignment. Keep in mind that you both must be authors of all code submitted and are strongly encouraged to only work on the assignment when you are with your partner.
Introduction
There are a variety of beautiful ways to use algorithms to procedurally generate art. In fact, many self-similar fractals like the Sierpinski carpet can be generated in very few lines of code using recursion.
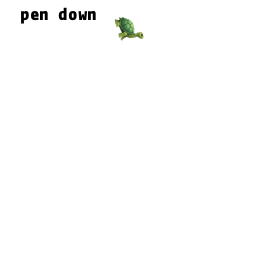
One of the most popular methods of procedurally generating art is using Turtle graphics. The intuitive idea behind the technique is placing a robotic “turtle” on a canvas that you can control with a remote. The turtle also has a pen and will draw on the canvas wherever it walks. With your remote, you can give the turtle simple commands like move forward 100 units, and turn 45 degrees to the right. Depending on the implementation, you can also command the turtle to change pen colors or even stop drawing while it is moving.
This assignment ultimately has three parts:
- Implementing a
Turtleclass that is capable of walking around drawing lines where it walks. - Drawing some simple shapes with the
Turtleyou implemented. - Creating your own procedurally generated art.
Part 1: Creating a Turtle Class
We will first implement our Turtle class. It will need to be able to keep track of its current location (a point), its current direction (an angle), and the graphics window that it is currently walking on. Below are more details to help you get started.
- Create a file named
turtle.py. - Write a class called
Turtlein this file that has the following features:- Should be able to be initialized with two parameters, such as
timmy = Turtle(win, pos), wherewinis aGraphWinobject which is the graphics window the turtle will be walking on and whereposis aPointobject which is the turtle’s initial position on the graphics window. - A method
getPosition()that returns the current position of the turtle. - A method
getDirection()that returns the angle the turtle is currently facing in degrees. A direction of 0 means the turtle is facing to the right, a direction of 90 means the turtle is facing up, a direction of 180 is facing left, and a direction of 270 is facing down. Initially, a turtle should always face to the right, i.e., be initialized with a direction of zero. - A method
turn(angle)that takes in an angleanglein degrees and turns the turtle counterclockwise by that angle. A negative angle should turn the turtle clockwise by that amount instead. Note that the actual direction of the turtle should stay within 0 (inclusive) and 360 (exclusive), and so subtracting 1 from 0 should become 359. - A method
move(distance)that takes in a single variabledistanceand causes the turtle to “walk” in its current direction for the current distance. This method should also draw a black line from the turtle’s previous position to its new position on the graphics window in which the turtle is living.
- Should be able to be initialized with two parameters, such as
- Be sure to write appropriate
docstringsfor the class, the__init__initializer, and each of the methods.
When implementing the move method, you may find the math.sin and math.cos functions from the math library useful. Keep in mind these functions take angles in units of radians rather than degrees. You can convert an angle from degrees to radians by using the math.radians function.
Testing Your Turtle
When you are testing your turtle class, you could consider opening it up in the REPL and command the turtle to walk around in real time such as:
>>> from turtle import Turtle
>>> win = GraphWin("Turtle Test")
>>> tammy = Turtle(win, Point(100, 100))
>>> tammy.move(50)
>>> tammy.turn(90)
>>> tammy.move(50)
After executing the above commands, you should see two lines from where the turtle walked 50 pixels to the right and then turned left and walked 50 pixels up. To keep track of where the turtle is, you could consider drawing a red circle at the current position of the turtle for testing purposes.
Below is a fun test function you could try:
def draw_fancy_spiral():
    """Shows a graphics window with a SUPER fancy spiral"""
    win = GraphWin("Fancy Spiral", 800, 800)
    win.setBackground("white")
    tommy = Turtle(win, Point(400, 400))

    distance = 350
    dist_multiplier = 0.99
    angle = 5

    for i in range(250):
        for j in range(4):
            tommy.move(distance)
            tommy.turn(90)
        distance = distance * dist_multiplier
        tommy.turn(angle)
The above function should generate the following image.

Part 2: Drawing Shapes
Now that we’ve finished implementing our Turtle class, let’s add some methods for drawing certain classical turtle shapes.
Drawing Polygons
Write a new Turtle method called drawPolygon(side_length, num_sides) that commands the turtle to draw a regular polygon with num_sides number of sides each with side length exactly equal to side_length. Thus, this method should make repeated use of the move and turn methods to maneuver the turtle in such a way to produce the appropriate polygon. The turtle should produce the polygon by making left turns (counterclockwise).
Important: Your method should return the turtle to its original location and angle. Thus, the turtle should rotate exactly 360 degrees and land in its original configuration.
For a few examples, suppose that we initialized a graph window and turtle in the following way:
>>> from turtle import *
>>> win = GraphWin("Polygon Test", 400, 400)
>>> theresa = Turtle(win, Point(100, 300))
Then each of the following shapes would be produced if the following method was called.
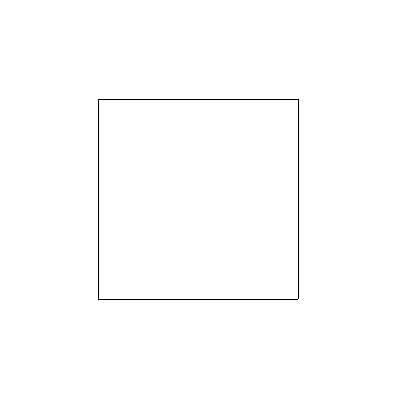
>>> theresa.drawPolygon(200, 4)
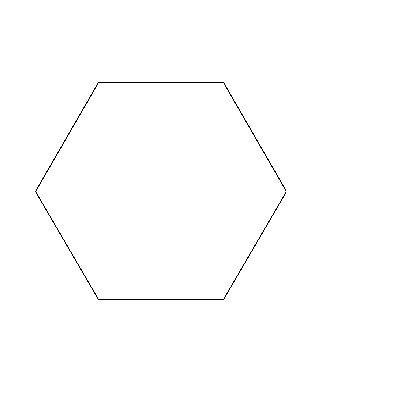
>>> theresa.drawPolygon(125, 6)
Drawing Fancy Lines
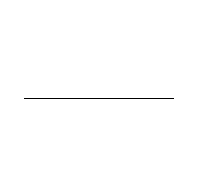
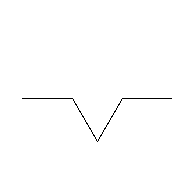
Currently, our Turtle class only has one method for moving from its current location forward to a new location: move(distance). If you run this method you get a path:
However, walking in a straight line is not nearly as fun as some other paths. For example, consider the following alternative Turtle method:
def move2(self, distance):
    self.move(distance / 3)
    self.turn(-60)
    self.move(distance / 3)
    self.turn(120)
    self.move(distance / 3)
    self.turn(-60)
    self.move(distance / 3)
If you add this method to your Turtle class and try running it, it would yield the following path:
However, some of my friends would say that this path is not nearly fancy enough. Let’s try going one level deeper:
def move3(self, distance):
    self.move2(distance / 3)
    self.turn(-60)
    self.move2(distance / 3)
    self.turn(120)
    self.move2(distance / 3)
    self.turn(-60)
    self.move2(distance / 3)
The move3 method calls move2 instead of the original move method. Thus, it produces a path like the following:
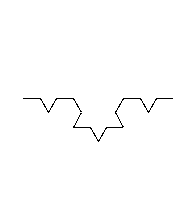
We can continue this process to produce fancier and fancier paths. However, there is one issue with what we have so far: a key mantra of computer science is Don’t Repeat Yourself (DRY) and the above two methods are identical except one makes calls to move and one makes calls to move2. Can we do better and generalize this to arbitrarily fancy lines? Of course!
Remove the move2 and move3 methods from your Turtle class if you added them, and write a method called moveRecursive that takes parameters distance and n. Calling the method koopa.moveRecursive(distance, 3) should produce the same path as calling koopa.move3(distance) above. This should be true for all positive integer values of n.
Drawing Fancy Polygons
Write a method in the Turtle class called drawRecursivePolygon(side_length, num_sides, n) that is identical to drawPolygon except that is uses moveRecursive with a value of n instead of the regular move method.
Calling drawRecursivePolygon(300, 3, 6) on a turtle in a graphics window of size 400x400 should produce the following image which is the Koch snowflake:

Part 3: Creative Art
For this last part, your task is to create a program my_art.py that, when executed from the Terminal, shows a graphics window with a creative piece of art systematically generated with one or more turtles. This part is intentionally open ended, but you must do something that is fundamentally different from Part 2 in some way. Here are a few ideas:
- You could add the following features to the
Turtleclass and start experimenting with colors, line width, and teleportation.- A method
setPenColor(color)that changes the pen color of the turtle. - A method
setPenWidth(num)that changes the thickness of the lines drawn by the turtle. - A method
teleport(new_pos)that teleports the turtle to thePointdefined bynew_poswithout drawing a line. This is handy if you want the turtle to jump to a different part of the image without drawing the line.
- A method
- You could explore other Lindenmayer systems which are especially easy to implement with turtles. (The Koch snowflake from Part 2 is a Lindenmayer system.)
- You could explore Google for more ideas for generating beautiful art with turtle graphics. But be careful not to use anyone else’s code. (Submitting code that is not your own work is a violation of our academic honesty policy.)
- If you enjoy mathematics, you might find some nice inspiration from a Mathologer video where Burkard Polster shows how some interesting patterns arise from drawing lines between points around the edges of a circle.
How to Turn in Your Code
a. Make sure that you and your partner are clearly identified at the top of every file you have created for this assignment.
b. All of your files need to be placed into the Hand-in/USERNAME/assignment7 directory. You can do this visually in Finder by copying all of your files in your StuWork/USERNAME/assignment7 directory into your Hand-in/USERNAME/assignment7 directory. (Note that you only need to do this once—it is not necessary for every member of your group to submit separately.)
c. Send all of your files to your partner so they have access to them, too!