Setting up your development environment
Nothing to hand in
You'll need to work on your own for this, since it involves setting up your own computer. But absolutely take advantage of our class Slack workspace to ask questions if you get stuck.
Goals
- Set up the tools that you'll need for this class on your working computer.
- Get familiar with the basics of a Unix command-line interface.
- Start using our class's Slack workspace to communicate with Jeff and the rest of the class.
Summary of your tasks
Here's the quick summary of your tasks. Much more detailed instructions are in the numbered sections below.
- Get ready to use Slack
- Accept the email invitation that you received for our Slack workspace.
- If you didn't receive it, let me know right away!
- Either install the Slack app on your work computer and/or your mobile device or bookmark our Slack workspace in your browsers if you prefer using the web interface. Make a plan that ensures that you'll check Slack once per day.
- Post a short introduction to yourself. See below for details.
- Set up a Unix command-line interface on your work computer.
- If you're on macOS or Linux, you already have a Unix command-line terminal app. If you're on Windows 10 or 11, install the Windows Subsystem for Linux (WSL).
- Make sure your Unix command-line includes the commands git, vi and/or vim, and python3.
- Set up a package manager suitable for your Unix command-line, and use it to install a program or two for practice.
- Get ready to use git and GitHub
- Set up an account on GitHub. (We won't start using this account until the next assignment, but getting it set up now will help.)
- Set up a Personal Access Token (PAT).
- Create a public git repository named "cs257".
- Make a small change to your repository and push it to GitHub (using your PAT).
- Report your GitHub account name to me via this survey.
1. Slack
Communication for this class is going to take multiple forms:
- Tasks (coding, writing, reading, video-watching, etc.) and their deadlines will be posted on the course website.
- Short lectures pre-recorded on video will be linked from the course website, and stored on my Panopto account. Videos will be available to anyone with a Carleton Moodle login.
- We'll talk during class.
- I will hold drop-in office hours in person (Olin 301A) and simultaneously via Zoom.
- Asynchronous discussion and Q&A will occur via the chat/discussion app Slack. This will include students asking questions and other students providing answers, students asking questions and me providing answers, students posting cool ideas or pointing out interesting resources, etc. That is, general conversation about the course content. It will also include announcements, corrections, class-wide clarifications, etc.
Here are your Slack-related tasks for this assignment.
- I sent you an email invitation to Slack before the term started. Follow the instructions in that email to accept the invitation.
- If you didn't receive the invitation, let me know via email right away!
- Either install the Slack app on your work computer and/or your mobile device or bookmark our Slack workspace in your browsers if you prefer using the web interface. Make a plan that ensures that you'll check Slack once per day.
- Edit your Slack Profile:
- Change your displayed name to your full preferred name (for example, I changed mine from "jondich" to "Jeff Ondich")
- If you're comfortable doing so, upload a profile picture of yourself so your classmates and I can recognize you.
- If it's common for people to mispronounce your name, I would be grateful if you would provide a name recording and/or pronunciation hints.
- Post a short introduction to yourself in the #general channel. Here's what I would like
you to include.
- Name and, if you wish, preferred pronouns
- What's one non-tech-related thing you like to do for fun?
- Who's a musician or writer or artist that makes your life better?
- Anything else you want to say.
- Please do not talk about computer stuff in this post. There will be plenty of opportunity for that later.
2. Unix on your computer
Unix is a family of operating systems whose shared heritage goes back to a project begun in 1969 by Ken Thompson and Dennis Ritchie. Linux is a Unix-based system. macOS is a Unix-based system. Holy cow, are there a whole lotta Unix-based systems.
There are three reasons I want you to have access to a Unix command-line interface on your working computer:
- A little bit of familiarity with Unix is essential knowledge for a well-educated programmer, even if you spend most of your time on Windows.
- Doing this setup gives you good practice setting up a development environment, which is another essential skill.
- Having a shared vocabulary and a shared set of tools will make our discussions of code quality much easier all term. Since I'm going to do all my demos in a Unix context, Unix is a good choice.
2.1 If you're working in the CS labs on 3rd Olin
Boot up macOS and you're good to go. Mike Tie has installed all the Unix tools you'll need. Follow any masking or other rules as posted in the lab in question.
2.2 Getting a Unix command-line interface on your own computer
This depends on your computer's operating system.
For macOS, the Terminal app (installed on all macOS systems as /Applications/Utilities/Terminal.app) gives you a Unix command line. Apple's variant of Unix is a descendant of Berkeley Unix from the early 80s, with occasional small Apple-specific adjustments. I recommend putting Terminal on your dock.
Linux systems all have at least one terminal app, with various names, depending on which Linux distribution you're running. In my experience, a terminal app is easily available via the desktop or default menus on Linux distributions.
On Windows 10 and 11, you don't get a Unix terminal by default. Instead, you'll need to install the Windows Subsystem for Linux (WSL), which will give you a Unix terminal app. To do the installation, follow these WSL installation instructions, with the following clarifications:
- You may, but need not, update to WSL 2.
- You may, but need not, enable the Virtual Machine Platform.
- Of course, only set WSL 2 as your default if you have installed it.
- Under "Install your Linux distribution of choice", I recommend that you choose Ubuntu 22.04 LTS. You may find that most documentation online is for version 20.04 LTS or even 18.04 LTS, but 22.04 LTS docs are catching up, and for the most part, the older information still applies to the newer version.
This is a lot more work for Windows users than for macOS or Linux users, but that just means you get to learn more than they do.
2.3 Make sure you have vi/vim, python3, and git
Open your Unix terminal app. Type the following command. (NOTE: you always hit Enter at the end of a command to execute it.)
The answer you will get will almost assuredly be:
The "which" command is saying that the "vi" command in your system is located at the path /usr/bin/vi.
Do it again for two more commands:
If you get nothing after either of those, you'll need to install the missing command with a package manager. Which brings us to...
2.4 Install a package manager
Package managers make it (relatively) easy to install, update, and uninstall software. That will be very handy as we add new tools to our toolkits later in the term.
On Windows 10 or 11, once you have installed WSL, you should have the command "apt" installed. You can run "which apt" in your Unix terminal to make sure. If you don't have "apt", then you surely have "apt-get".
On Linux, same thing as on Windows—apt or apt-get.
On macOS, I strongly recommend that you use the Homebrew package manager. Go to that link and follow the brief installation instructions at the top of the page.
As an example, let's install the package "imagemagick", which is a collection of tools that help you manipulate image files. I picked this example because it's an interesting and very handy tool that is not installed by default on any operating system I know of. Here are the commands that you could use to do the installation:
Note that "sudo" (from "super-user do") allows you to execute commands with the Unix version of "administrator privileges". Sometimes, you can try to execute a command and you'll be told you don't have permission to do so. For example, when I try "apt install imagemagick" on my WSL terminal, I get told "Could not open lock file" and "Permission denied", which is a slightly perplexing way to say "only administrators are allowed to do that". But if I do "sudo apt install imagemagick" and enter my administrator password when prompted, everything works fine.
Once you have imagemagick installed, you can try any of its zillions of options. For example, suppose I want to take a JPG file of my dog (maisie.jpg) and scale it to half width and half height (thus cutting the file size by approximately a factor of 4), and also convert it to PNG format. This command will do the job:
2.5 Install python3 and git, if necessary
Remember executing the commands "which python3" and "which git"? If either one of those "which" commands returned nothing—that is, the command in question isn't available on your system—then it's time to install whichever command is missing.
On macOS, that would be "brew install git" and/or "brew install python3".
On Linux or WSL, "sudo apt install git" and/or "sudo apt install python3".
3. git and GitHub
One of the most important tools in a programmer's toolkit is version control software. Version control gives you a convenient way to: back up your documents (code, documentation, data, images, etc.); track document changes over time; roll back a document to an earlier version; share the editing of documents with your collaborators; etc. Version control systems are powerful, complicated, and indispensible for both individual programmers and teams.
This term, we will use the version control system git. We will also use GitHub, a website and company that provide hosting and other services for people using git. The central copies of your work will live on GitHub, and you will transfer the changes that you and your collaborators make to your code and other documents back and forth between your individual machines and GitHub via git commands.
To do this, you will need a GitHub account. So:
- If you already have a GitHub account that you want to use for CS257, great. Login to it and make sure your Carleton email address is one of the addresses associated with your account (you can add email addresses to an existing GitHub account via Settings→Emails).
- If you don't have one already, or you do have one but you don't want to use it for this class, go to https://github.com/ and create a new account using your Carleton email address.
- I strongly urge you to pick a user name that you would be comfortable putting on your resume. Your GitHub account can be a key element of your argument for getting an internship or a job, and you don't want to have a user name that's too weird or goofy (or worse).
Create a Personal Access Token (PAT) to enable you to "push" (i.e. save) changes to GitHub repositories from the command line. GitHub will not allow you to push changes using your password, so you're going to need this PAT right away.
Follow GitHub's instructions for creating a PAT. These instructions are pretty straight-forward, with a couple things to watch out for:
- Set the expiration date for past the end of the term so you don't have to deal with it expiring in the middle of working.
- In the section "Select the scopes...", check "repo". You don't need to check any other checkboxes there.
- In the section "Click Generate token...", make sure to copy and paste your token somewhere onto your local computer, since you won't ever have a chance to get it again. (You could always generate a new token if you lose this one, but who wants to do that?)
Create a repository to use for this class. Click on the green "New" button (near the upper left of github.com when you're logged in), and then make these choices:
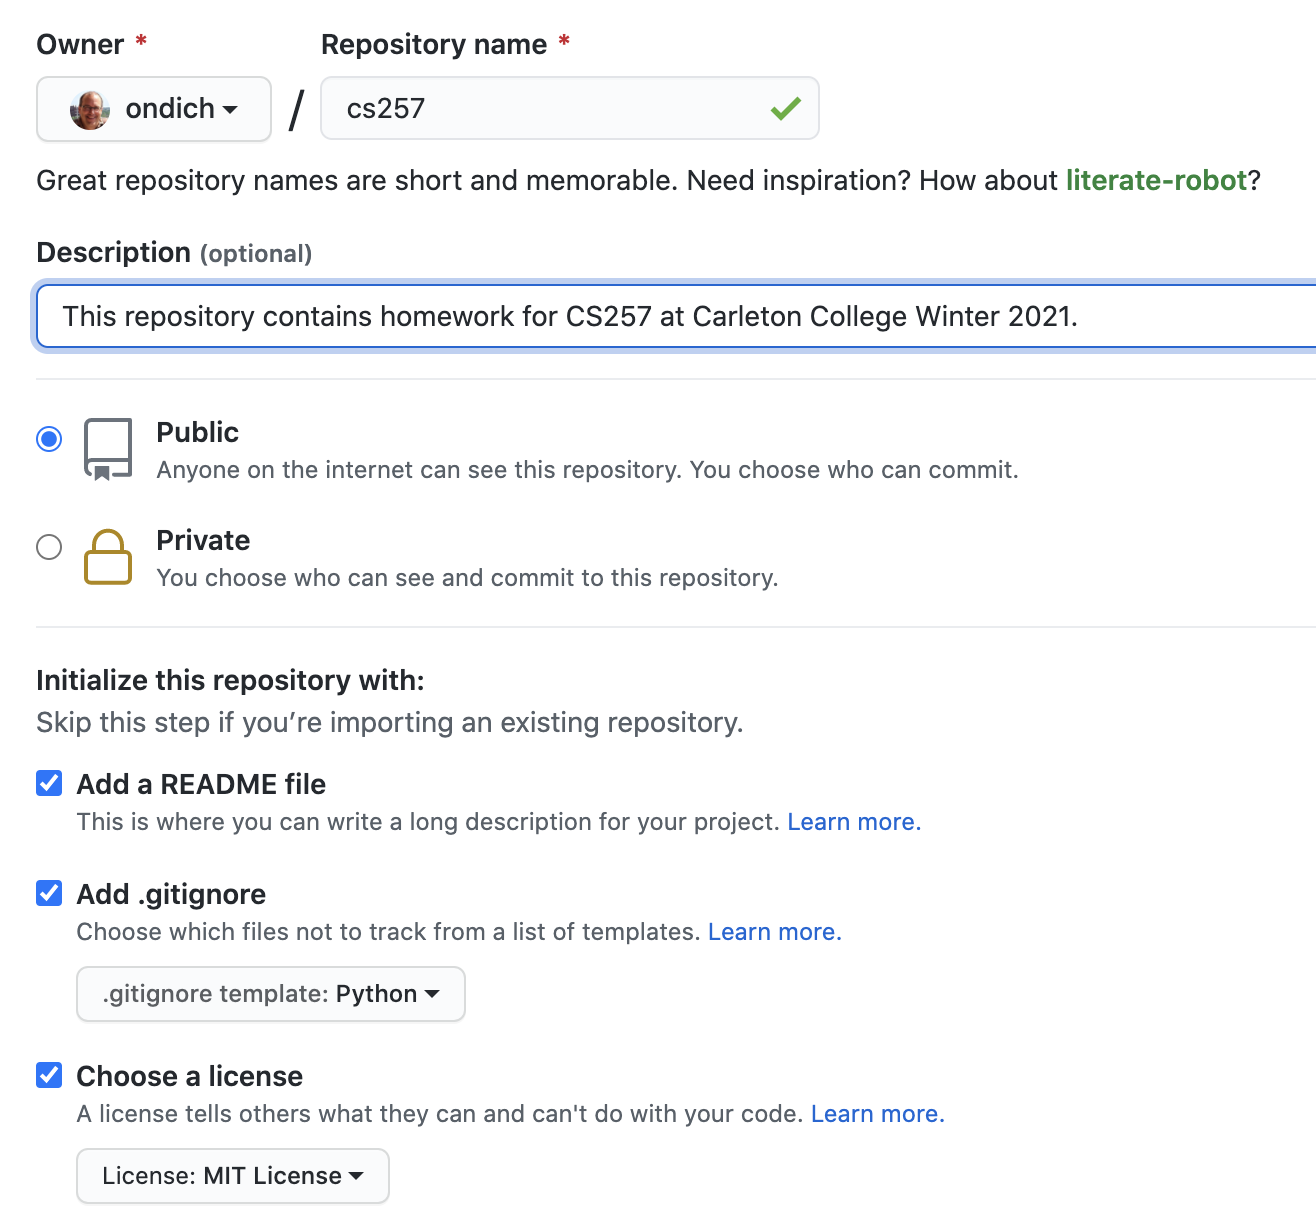
A couple notes about these selections:
- Please name your repository "cs257".
- You might not have the option of choosing Public vs. Private. In any case, we want these repositories to be public so your classmates can easily read and comment on your code.
- Do include a README.md file, and give it a brief Description along the lines of what I've shown in this screenshot. (Note that the screenshot is from winter 2021—modify accordingly.)
- Do include the Python .gitignore file. This file's presence in your repository will prevent you from accidentally adding some Python-related junk to your repository that shouldn't get added. We'll discuss these files in detail later.
- You may pick a license file or not include one, as you wish. When I'm writing code that I'm happy to have other people use however they wish, I like to use the MIT license. In any case, this is up to you.
- Once you have a GitHub user name and repository, please report them to me via this survey.
No need to do anything further with your GitHub account for this exercise. We'll start using it for your next assignment.
All done
That's all for now. You have a Unix terminal on your computer, including vi, python3, and git, and you have a git repository ready on GitHub. Next up: we'll start learning how to use all this stuff.