You'll need to work on your own for this, since it involves setting up your own computer. But take advantage of our class Slack workspace to ask questions if you get stuck. Also, if you have a friend in the class, doing this setup side-by-side or while connected over Zoom can make it more fun and probably more productive.
Goals
- Start using our Slack workspace to communicate the class.
- Get access to Kali Linux on a VirtualBox virtual machine, which you'll need for this class on your working computer.
- Get familiar with the basics of git, GitHub, and the Unix command-line interface.
Resources mentioned below
Here are a few potentially useful resources all in one place. See below for details on what these resources are for.
- [VIDEO] short demo of REMOTELAB
- [VIDEO] long-ish demo of installing VirtualBox and Kali on a Windows 10 computer (much of which is exactly the same on macOS)
- [TUTORIAL] Guide to using git in this class
Your tasks, part 1: Slack
- Accept the email invitation that you received for our Slack workspace.
- If you didn't receive it, let me know right away!
- Install the Slack app on your work computer and/or your mobile device (if you have one). Make a plan that ensures that you'll check Slack once per day.
- Post a short introduction to yourself in the #general channel. Here's what I would like you to include.
- Where are you this term?
- What's one non-tech-related thing you like to do for fun?
- Who's a musician or writer or artist that makes your life better?
- Anything else you want to say.
- Please do not talk about computer stuff in this post. There will be plenty of opportunity for that later.
Your tasks, part 2: Kali Linux
For many of our investigations into practical computer security this term, we're going to use tools installed on the Kali distribution of Linux. If you had the spare computer, the time, the right kind of computer, and the inclination, you could install Kali as your computer's operating system. But that's impractical for most of us, so instead, we're going to use Kali installed in a virtual machine. To do so, you have a few options, depending on your situation.
Use REMOTELAB. Carleton's ITS has set up a system of virtual machines that you can use remotely, as though you were in one of Carleton's physical labs. The REMOTELAB computers are all set up, like Carleton's physical lab machines, to boot either Windows or macOS. They also have the app VirtualBox installed, with virtual machines for Kali and Metasploitable preconfigured and ready to use.
Here's a short video demonstrating REMOTELAB that I made for you.
Note that REMOTELAB has a limited number of simultaneous users for the entire Carleton community (43 at this writing), so if you are able to use one of the other options for accessing Kali, you might want to do so.
Use the computers in Olin 304, 308, and 310. Launching Kali via VirtualBox on the macOS installations in these socially distanced labs is pretty much identical to doing so on REMOTELAB.
Install Kali in VirtualBox on your own computer. This would be ideal for most of you, for your own convenience. However, there are a couple caveats:
- If you are using a Mac with an Apple M1 processor, VirtualBox won't work.
- If you are using a Windows machine that does not support virtualization, VirtualBox won't work.
If either of these situations applies to you, you will need to use REMOTELAB or the Olin labs to do the exercises that require Kali.
How can you tell whether your Windows 10 machine supports virtualization? Right-click on the task bar (the bar on the bottom of the screen) and select Task Manager. Then select the Performance tab. Look in the bottom right of the Performance screen:
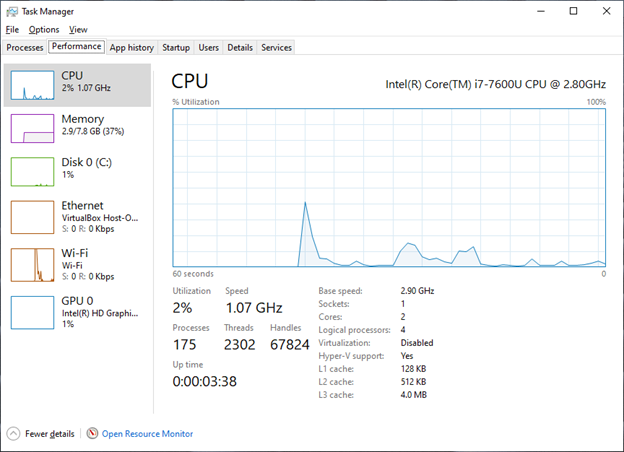
If it says "Virtualization: Enabled" in the bottom right, then you've hit the jackpot—not only does your computer support virtualization, but it's already turned on and you're ready to use VirtualBox. If it says "Virtualization: Disabled", you will need to enable virtualization, which will require you to interact with the BIOS on your computer before VirtualBox will work.
I made a video showing the installation of VirtualBox and Kali on a Windows 10 computer. The BIOS part and some of the pre-VirtualBox shenanigans are Windows-specific, but the rest of it applies to both Windows and macOS.
So IN SUMMARY:
- If you're working on an M1 Mac, you will need to use REMOTELAB or the 3rd-floor Olin labs
- If you're working on a PC that does not support virtualization, same thing: REMOTELAB or Olin
- If you're working on an Intel Mac or a PC that supports virtualization and you have 20GB of disk space free, I recommend that you install VirtualBox, and then install Kali on VirtualBox. This will be more convenient for you, and will reduce the overall load on REMOTELAB. That said, even if you're in this category, you are welcome to use REMOTELAB and the Olin labs.
Your tasks, part 3: git and GitHub
To submit your work for this class and to support collaborative work with your classmates, you will use a git repository to store your code, documentation, presentations, etc.
Here's the short version of your git setup tasks:
- If you don't already have one, create a free account on GitHub.
- Create a GitHub repository named "cs231" or something similar for your work in this class. Make it public and give it a README.
- Add a .gitignore file to the top level of your repository, containing at least the following:
.DS_Store *.pyc __pycache__/
- Fill out this survey so I can get access to your repository
Don't know anything or much at all about git? Follow these detailed git startup instructions.
Your tasks, part 4: what to hand in, and how
- As specified above, post in #general on our Slack workspace.
- As requested above, fill out the GitHub survey.
- Add a folder named "setup" at the top level of your git repository. (While you're at it scroll to the very top of this page that you're reading right now, and note that it says "Folder: setup" under the assignment title. Whenever I include a "Folder:" specification like that, I'll expect you to put your work in a folder of the specified name.)
- Make sure your repository includes a .gitignore file with at least the contents specified above.
- In setup, create a text file named status.txt. In that file, put your name at the top. Then describe briefly your plan for using Kali, and the status of your Kali installation (if any). You can put any other observations or concerns here as well. Don't put questions here, though—use Slack's #questions channel. (You might ask "why do I need to include my name in status.txt, when it's in my repository?" (1) in some cases, you'll be sharing documents with me and your classmates, and having your name in your documents will lead to less confusion; (2) it's a good habit to put brief name-plus-title-or-description info at the top of your professional documents.)
- Make sure to "git add" both .gitignore and setup/status.txt, commit your changes, and push the whole thing to the GitHub copy of your repository so I can get at it.
All done
That's all for now. Next up: we'll start learning how to use Kali and its many tools.